How To Add A Signature In Apple Mail
Many business professionals judge credibility based on email signatures, yet Apple Mail users struggle with signature creation more than users of any other email client. While Gmail and Outlook offer intuitive signature builders, Apple Mail's signature interface remains buried in preferences menus, causing many people to not know how to create an email signature on Mac.
HubSpot's free email signature generator for Apple Mail solves this complexity by creating Apple Mail-compatible signatures within minutes. Unlike Apple's built-in editor, which lacks formatting options and image support, our free tool generates Apple Mail signatures that work seamlessly across all devices while maintaining perfect formatting.
Use HubSpot’s Email Signature Generator for Apple Mail to seamlessly create an Apple Mail signature within minutes, eliminating the 15-minute struggle with Apple's native editor. While Apple Mail's built-in signature tool lacks essential features like social media icons, banner images, and proper formatting controls, HubSpot's free generator produces perfectly formatted signatures that work seamlessly across all Apple devices.
How To Create A Signature For Apple Mail:
1. Access HubSpot's Email Signature Generator: Visit Email Signature Generator and choose from 11+ professional templates to create your signature.
2. Input Your Professional Information: Enter your name, title, and company details. You can also upload your company logo and include your social media profiles.
3. Customize Design Elements: Select color schemes matching brand guidelines and choose from professional fonts.
4. Generate Apple Mail-Optimized HTML Code: Click "Create Signature" for instant generation and copy your formatted Apple Mail HTML signature with one click!
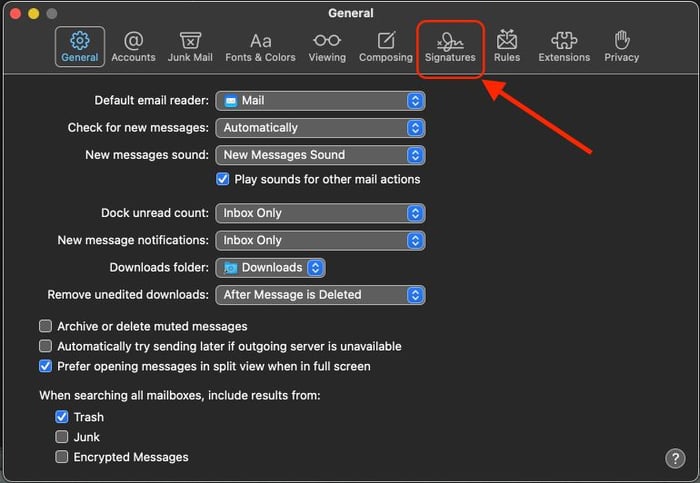
1. Open the Mail application on your device.

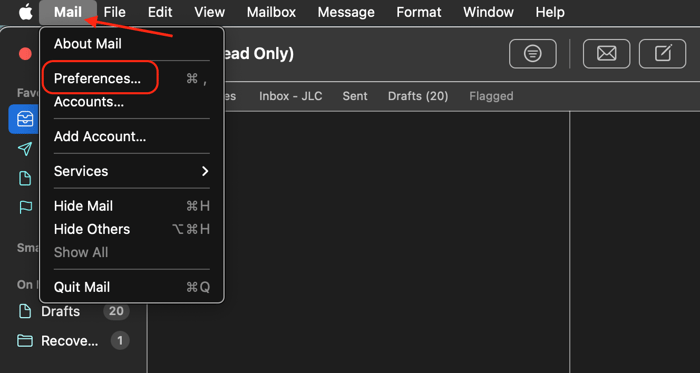
2. Navigate to Mail > Settings (formerly Preferences).

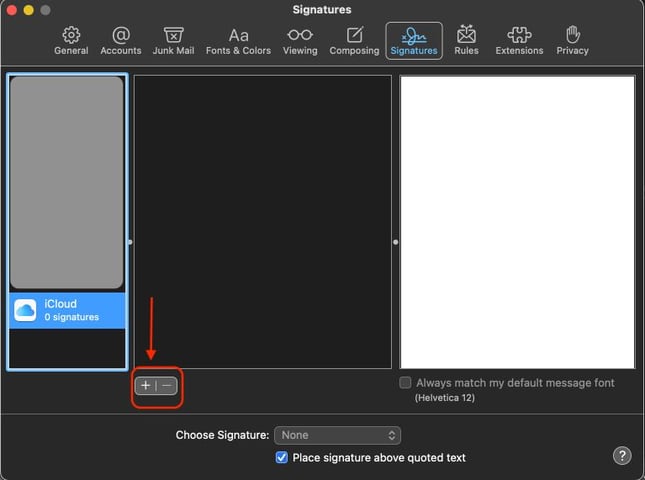
3. Select the Signatures tab.

4. Select the account that you want to create a signature for.

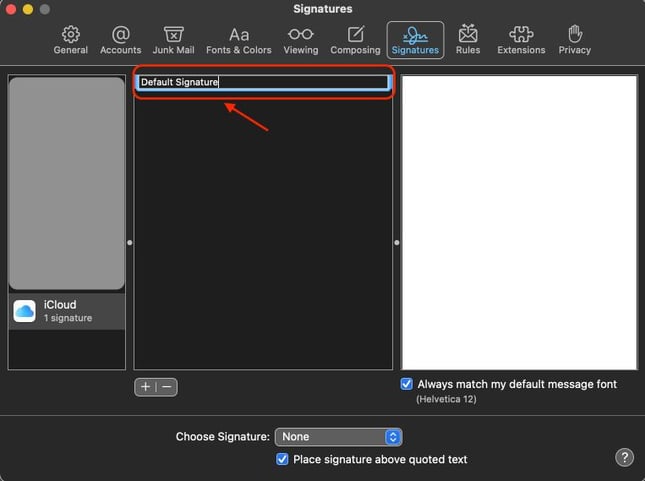
5. Click the + button to create new signature

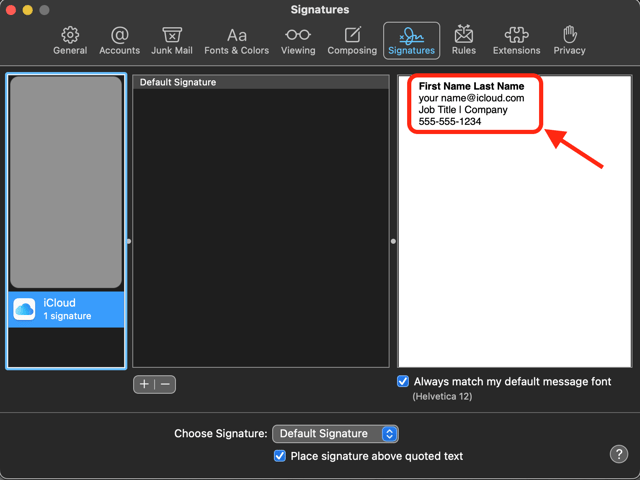
6. Enter your signature details in the preview pane. You can add text, change formatting, or drag an image into the preview box.

Following these steps, you have created your own email signature for Apple Mail to use across all your email communications moving forwards.

Configuring automatic Apple email signature insertion saves time per email and ensures consistent brand representation.
Mac Automatic Signature Setup:
1. Open Mail > Settings/Preferences.

2. Navigate to ‘Signatures’ and select an email account from the left column.

3. Choose a signature from middle column

4. Use the "Choose Signature" dropdown to set this signature as the default.
Creating a Mac mail signature is straightforward, but ensuring it displays perfectly requires attention to detail. These proven formatting strategies will help your signature maintain its professional appearance across devices.
Mobile signature creation on iPhone presents unique challenges due to iOS limitations. The Settings > Mail > Signature interface provides only basic text input, forcing users to employ workarounds for professional signatures.
iPhone Signature Workarounds:
1. Create your signature on the desktop first.
2. Email your signature to your iPhone.
3. Copy the formatted signature from your email.
4. Paste the signature into Settings > Mail > Signature.
5. Verify the formatting preserved correctly.
Common iPhone signature issues include image scaling problems, font substitution on recipient devices, and hyperlink color changes. However, HubSpot’s iOS Mail Signature Generator creates signatures that maintain format accuracy even when viewed on different platforms.
Adding logos to Apple Mail signatures requires specific techniques to ensure images display correctly across all email clients. Use HubSpot’s Mac Email Signature Creator to add logos quickly and seamlessly to your Apple Mail email signature.
Mac Desktop:
1. Resize logo to a maximum 200px width.
2. Save as a PNG with a transparent background.
3. Drag your image directly into the signature editor.

4. Position using your spacebar (not formatting tools)
5. Test by sending an email to yourself
Apple Mail's HTML signature implementation requires advanced techniques since the application lacks native HTML import functionality. Professional signatures demand HTML for consistent formatting across email clients.
While mastering the manual workaround takes technical skill (learn the complete process in our guide on how to add a HTML signature in Apple Mail), there's a faster solution– HubSpot's Apple Mail HTML signature generator. Simply design your signature using our easy-to-use visual signature builder, then follow these straightforward steps to implement it in Apple Mail:
1. Copy your generated HTML signature. 
2. Open your mail app, then navigate to “Mail” and “Preferences”.
3. Select “Signatures”. Label your new signature, then uncheck the box that says ‘Always match my default message font’.

4. Paste your signature into the designated field and save your settings. Your professionally formatted signature will now automatically appear in every new email you compose.

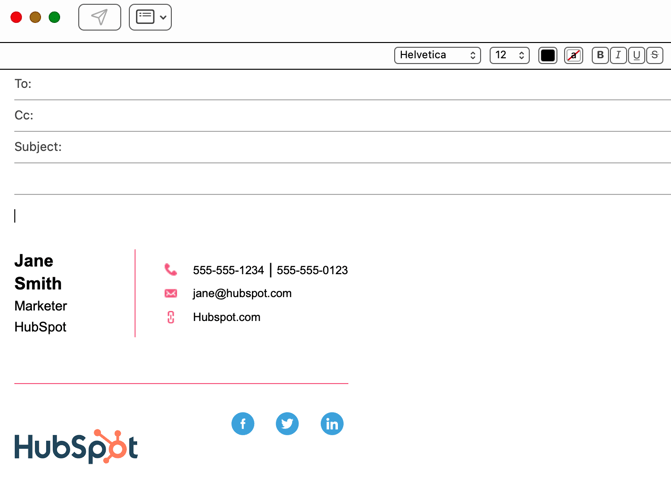
HubSpot's free Apple Mail Signature Generator creates Apple Mail-compatible signatures in minutes – faster than any other solution. Get an email signature for Mac Mail complete with social icons, contact details, and branding elements that maintain pixel-perfect alignment everywhere. Use this Apple Mail Signature Creator for professional signatures that work perfectly across all devices – zero HTML knowledge required!
Creating an Apple Mail signature takes only minutes using HubSpot's free email signature generator for Mac. Our tool produces a HTML Mac email signature that preserves your images, formatting, and design elements perfectly across every device and email platform.
How To Add A Signature In Mac Mail:
Add signatures to Apple Mail by navigating to Mail > Settings > Signatures on Mac or Settings > Mail > Signature on iPhone. Click the + button to create new signatures, then assign them to specific email accounts.
For complex signatures with logos and social links, create your signature using HubSpot's Email Signature Generator, copy the output, and paste into Apple Mail's signature editor with "Always match default font" unchecked.
Email signatures generate brand impressions and increase response rates. Professional signatures establish credibility, provide essential contact information, and ensure legal compliance for business communications. Studies show emails with professional signatures receive more responses than those without, while saving time per email by eliminating manual contact information entry. Use HubSpot’s free Email Signature Generator for Apple Mail to quickly create a professional email signature today.
Create an Apple Mail signature with an image within minutes using HubSpot’s Email Signature Generator. Or, drag your Apple Mail signature image directly into the signature editor on Mac or using the copy-paste method on iPhone. For reliable display, resize images to under 200px width and 50KB file size.
Change your signature for Apple Mail through Mail > Settings > Signatures on Mac or Settings > Mail > Signature on iPhone. Select the existing signature and modify directly in the preview pane. For immediate updates across all devices, delete the old signature and create a new one. Changes to existing signatures may take 24-48 hours to sync across iCloud-connected devices.
Import your Gmail signature to become a signature in Apple Mail by copying the formatted signature from Gmail settings and pasting into Apple Mail's signature editor. First, access Gmail Settings > General > Signature, then select and copy your entire signature. In Apple Mail, create a new signature and paste with "Always match default font" unchecked. Images may require re-insertion due to compatibility differences between platforms.
To create a professional employee email signature in Apple Mail, open Mail > Settings > Signatures and click the "+" button to add a new signature. Design your signature with your company branding, including your name, title, department, contact information, and company logo.
For advanced HTML formatting that maintains professional consistency across all email clients, use HubSpot's free Apple Mail signature generator– simply input your employee details, customize the design to match company standards, and implement the generated HTML code. Ensure your signature complies with your organization's brand guidelines for fonts, colors, and required legal disclaimers.
Create custom Apple Mail signatures using HubSpot's free Email Signature Generator or Apple Mail's built-in editor with HTML modifications. Custom signatures featuring logos, social links, and branded designs require HTML formatting for consistency. Professional custom signatures increase email response rates compared to default text signatures, making the 5-minute setup time worthwhile for business users.
Access free Apple Mail signature templates through HubSpot's Email Signature Generator, which offers 11+ professionally designed templates optimized for Apple Mail. While Apple doesn't provide official templates, our generator includes designs for various industries and styles. Templates feature drag-and-drop customization, ensuring perfect rendering in Apple Mail without HTML knowledge or design skills.
Apple Mail signatures fail to appear due to four common issues: signatures not being assigned to email accounts, "Include signature" being left unchecked in the compose window, iCloud sync delays, or corrupted signature files. Resolve by checking Mail > Settings > Signatures to ensure signatures are assigned to accounts, verifying compose window settings, or recreating signatures if files are corrupted.