Summarize this page with your favorite AI assistant and save time by clicking on an icon below ⬇️
Setting up a new Gmail account requires only 5 simple steps and provides immediate access to Google's ecosystem, including 15GB of free cloud storage, integrated calendar, and advanced spam filtering that blocks 99.9% of dangerous emails. Learn how to set up a new Gmail email address and unlock all the powerful benefits of Google's integrated ecosystem today.
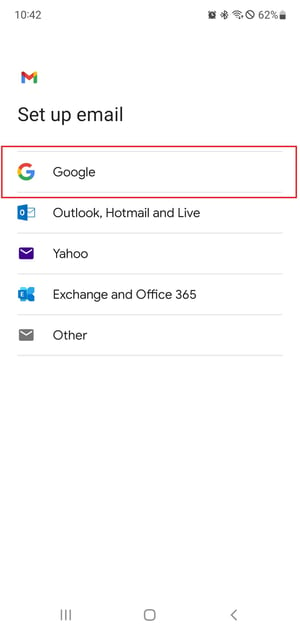
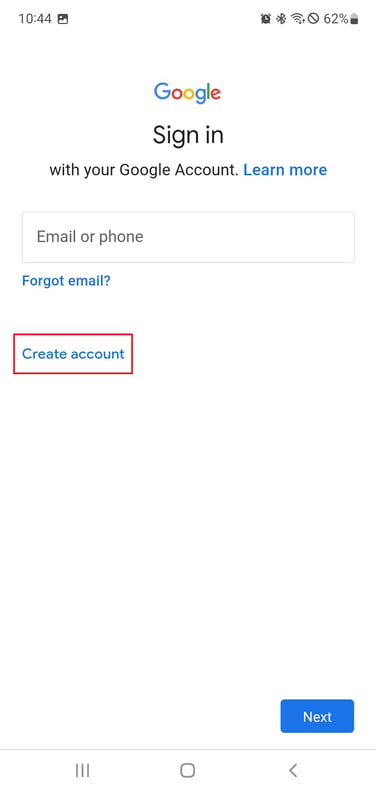
Step 1: Visit Gmail’s Website
Navigate directly to gmail.com or accounts.google.com/signup to begin setting up a new Gmail account. The blue "Create an account" button appears prominently in the top-right corner of the page, visible on all desktop browsers including Chrome, Firefox, Safari, and Edge.
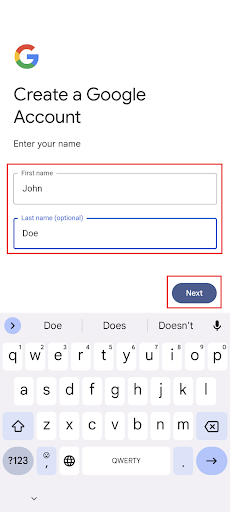
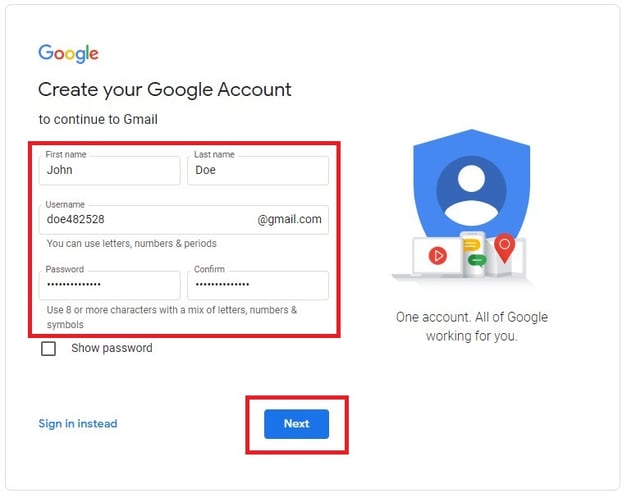
Step 2: Fill In Your Information
Gmail's account creation form requires three essential components: your first and last name (which becomes your display name), a unique username (the part before "@gmail.com" - for example, "johnsmith2025" in "johnsmith2025@gmail.com"), and a secure password containing at least 8 characters with a mix of letters, numbers, and symbols. A longer password of 12 or more characters is recommended for security.
Gmail instantly checks username availability and suggests alternatives if your preferred choice is taken.
Step 3: Verify Your Phone Number
Phone verification enhances account security and enables account recovery if you forget your password. Gmail sends a 6-digit verification code within 5-10 seconds via SMS text message or automated voice call. Enter this code in the verification box and click "Verify" to confirm your identity and proceed to the next step.
Step 4: Accept Google's Terms Of Service And Privacy Policy
Google's terms of service outline your rights as a Gmail user, including data privacy protections, account usage policies, and Google's commitment to keeping your information secure with industry-leading encryption. The privacy policy explains how Gmail uses data to improve services while maintaining user confidentiality.
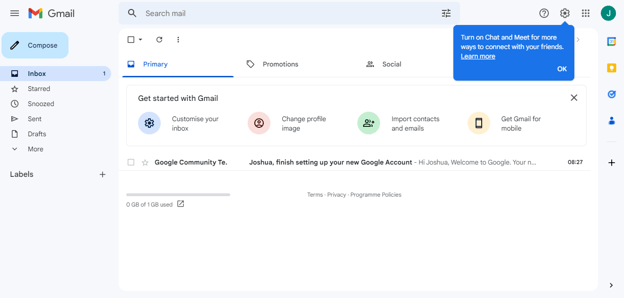
Step 5: Personalize Your Account
Your new Gmail dashboard provides immediate access to powerful features: inbox categories (Primary, Social, Promotions), customizable labels for organization, email signature personalization, and email forwarding options.
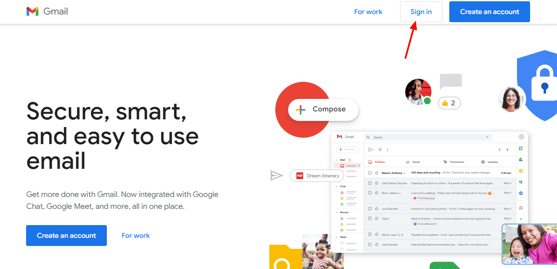
Step 6: Sign Into Your New Gmail Account
Access your new personal Gmail account by visiting gmail.com and clicking the "Sign in" button in the top-right corner. Enter your full email address (username@gmail.com) and password. Enable "Stay signed in" for convenient access on personal devices, or use incognito mode for secure access on shared computers.
Mobile Gmail setup provides the same powerful features as desktop, with additional benefits like push notifications, offline access, and swipe gestures. You can create a new Gmail account by mobile number verification, making the process even more secure.
Step 1: Open The Gmail App
To create a new Gmail account on iPhone, download the official Gmail app from the App Store. Android users can get it from Google Play Store. Both versions are completely free and include all desktop features optimized for touchscreen use, whether you're learning how to set up Gmail on iPhone or Android.
Step 2: Tap the “Add Account” Button
Launch the Gmail app and tap "Sign in" on the welcome screen, then select "Add account" to begin setup. Gmail supports unlimited account switching, making it ideal for managing personal and business emails separately when you set up a new Gmail account on Android or iOS devices.
Step 3: Select “Google” From Email Provider List
The account type selection screen displays multiple email providers including Outlook, Yahoo, and Exchange. Choose "Google" to create a new Gmail account by mobile number verification with full access to Google's ecosystem, including Calendar, Drive, Photos, and Meet integration.
Step 4: Set Your Email Address And Password
Tap "Create account" at the bottom of the sign-in screen to start registration. When you create a new Gmail account on iPhone or Android, you can pick from several name suggestions or enter your own.
Step 5: Set Up Your Account
Customize your mobile Gmail experience by selecting a profile picture (camera or gallery upload), entering your display name, and configuring notification preferences. Add an email signature to add a personalized element to each email you send.
Mobile-specific Gmail options include conversation view, swipe actions, and default reply behavior that optimize email management on smaller screens.
Step 6: Accept the Terms of Service and Log In
Review Google's mobile-specific terms covering app permissions, data usage, and privacy protections. Tap "I agree" after reviewing these mobile-specific considerations. The account you just created using your mobile number is now ready for immediate use.
Gmail allows you to access Google's entire ecosystem – including Drive, Calendar, and Meet – without changing your current email address. This feature enables professionals to keep their business email or existing personal email while gaining Gmail's advanced features.
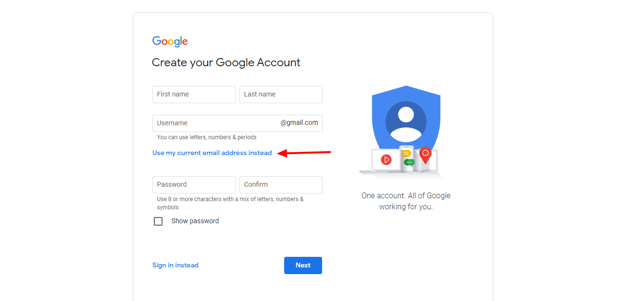
Step-by-Step Process to Create Gmail Account with Existing Email:
During the standard Gmail account creation process on desktop (gmail.com) or mobile (Gmail app), you'll encounter an often-overlooked option: "Use my current email address instead". This link appears directly below the username field on the account creation page, enabling you to register with email addresses from any provider including:
Creating a second Gmail account takes just 3 minutes and allows you to separate personal and professional emails, manage multiple businesses, or create dedicated accounts for online shopping and subscriptions. Google permits multiple Gmail accounts per user with no official limit.
Method 1: Add Account Within Gmail
While logged into your existing Gmail account, click your profile picture in the top-right corner and select "Add another account". This streamlined process skips several steps since Google already has your device verified. You'll only need to provide a new username, password, and complete phone verification. All your accounts remain easily accessible through the account switcher, allowing one-click transitions between inboxes.
Method 2: Create Fresh Account via Incognito/Private Mode
Open an incognito browser window (Ctrl+Shift+N on Chrome, Cmd+Shift+N on Mac) and navigate to accounts.google.com/signup. This method ensures complete separation from your existing account during setup. Follow the standard 5-step creation process: choose username, set password, verify phone number, accept terms, and personalize settings.
Managing Multiple Gmail Accounts Efficiently:
HubSpot's Email Signature Generator creates mobile-optimized, professional Gmail signatures in under 2 minutes, solving the limitations of Gmail's basic text editor. First, design your signature using HubSpot's visual editor, which automatically formats social media icons, company logos, and clickable CTAs without requiring design experience. Second, copy the generated HTML. Third, install in Gmail by navigating to Settings (gear icon > "See all settings" > Signature section), pasting your HTML signature, and selecting "Insert signature before quoted text".
Maximize your Gmail account’s potential by completing these essential setup steps within your first week: